1. HTML
In this section, we use UL List to form the structure. The first level UL will be the navigation menu, and the second level UL that resides inside each first level UL's LI will be the submenu.
There is some rules over here about the classes and rel attribute, let me explain:
- .popular, .category, .comment Classes in the anchor element (first level) are used for the styling of the menu.
- Rel atribute in the anchor element (first level) is used by javascript to add and remove "selected state" aka change the menu image after it was clicked
- .last Class is used to remove border bottom for the last item
1 2 3 4 5 6 7 8 9 10 11 12 13 14 15 16 17 18 19 20 21 22 23 24 25 26 | <ul id="accordion"> <li> <a href="#" class="popular" rel="popular">Popular Post</a> <ul> <li><a href="#">Popular Post 1</a></li> <li><a href="#">Popular Post 2</a></li> <li><a href="#" class="last">Popular Post 3</a></li> </ul> </li> <li> <a href="#" class="category" rel="category">Category</a> <ul> <li><a href="#">Category 1</a></li> <li><a href="#">Category 2</a></li> <li><a href="#" class="last">Category 3</a></li> </ul> </li> <li> <a href="#" class="comment" rel="comment">Recent Comment</a> <ul> <li><a href="#">Comment 1</a></li> <li><a href="#">Comment 2</a></li> <li><a href="#" class="last">Comment 3</a></li> </ul> </li></ul> |
2. CSS
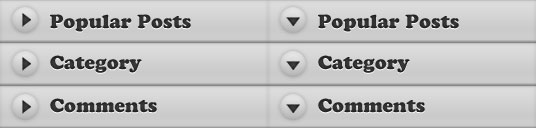
CSS is pretty simple, we are using two UL Lists. So, what we do is, style the first level UL, skin it with images, and after that, style the second UL List and hide it.Have you heard about CSS Sprite? CSS Sprites are the preferred method for reducing the number of image requests. Combine your background images into a single image and use the CSS background-image and background-position properties to display the desired image segment. Yes, this is the image we are using for this tutorial:
And, if you wish to learn more about CSS, you can read my previous posts:
1 2 3 4 5 6 7 8 9 10 11 12 13 14 15 16 17 18 19 20 21 22 23 24 25 26 27 28 29 30 31 32 33 34 35 36 37 38 39 40 41 42 43 44 45 46 47 48 49 50 51 52 53 54 55 56 57 58 59 60 61 62 63 64 65 66 67 68 69 70 71 72 73 74 | /* First Level UL List */#accordion { margin:0; padding:0; list-style:none;} #accordion li { width:267px; } #accordion li a { display: block; width: 268px; height: 43px; text-indent:-999em; outline:none; } /* Using CSS Sprite for menu item */ #accordion li a.popular { background:url(menu.jpg) no-repeat 0 0; } #accordion li a.popular:hover, .popularOver { background:url(menu.jpg) no-repeat -268px 0 !important; } #accordion li a.category { background:url(menu.jpg) no-repeat 0 -43px; } #accordion li a.category:hover, .categoryOver { background:url(menu.jpg) no-repeat -268px -43px !important; } #accordion li a.comment { background:url(menu.jpg) no-repeat 0 -86px; } #accordion li a.comment:hover, .commentOver { background:url(menu.jpg) no-repeat -268px -86px !important; } /* Second Level UL List*/ #accordion ul { background:url(bg.gif) repeat-y 0 0; width:268px; margin:0; padding:0; display:none; } #accordion ul li { height:30px; } /* styling of submenu item */ #accordion ul li a { width:240px; height:25px; margin-left:15px; padding-top:5px; border-bottom: 1px dotted #777; text-indent:0; color:#ccc; text-decoration:none; } /* remove border bottom of the last item */ #accordion ul li a.last { border-bottom: none; } |
3. Javascript
There are two major sections in this javascript click event:- First section: Reset everything back to default. What it does, hide all the submenus and also reset all the arrow to default position.
- Second section: Display the selected item and change the arrow direction
It gets a little bit tricky in resetting the arrow back to default position. I'm using for each method to loop thorugh the menu, grab its REL and and remove the classes. I think there are different ways to accomplish it. If you do know a better way, please let me know and I will ammend it.
1 2 3 4 5 6 7 8 9 10 11 12 13 14 15 16 17 18 19 20 21 22 23 24 25 26 27 28 29 | $(document).ready(function () { $('#accordion li').click(function () { /* FIRST SECTION */ //slideup or hide all the Submenu $('#accordion li').children('ul').slideUp('fast'); //remove all the "Over" class, so that the arrow reset to default $('#accordion li > a').each(function () { if ($(this).attr('rel')!='') { $(this).removeClass($(this).attr('rel') + 'Over'); } }); /* SECOND SECTION */ //show the selected submenu $(this).children('ul').slideDown('fast'); //add "Over" class, so that the arrow pointing down $(this).children('a').addClass($(this).children('li a').attr('rel') + 'Over'); return false; }); }); |
Conclusion
Like this tutorials? You can express your gratitude by visiting my sponsors on the sidebar, bookmark it and help me to spread this tutorial to our friends! :) Thanks!
No comments:
Post a Comment